Cut and Paste Advertisement
1.) What are your input factors?
- Scissors
- Magazine
- Glue
- Paper
- Crayons
2.) Describe process in detail:
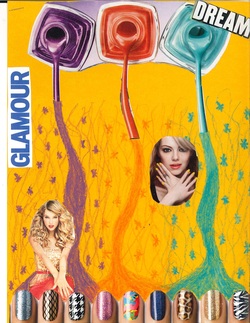
Basically, in this project, we all brought in magazines so we can cut the pictures out to make our ads. First, we thought of an idea for an ad by looking through different magazines. Next was cutting out the pictures that were needed in the magazine ad. Once the pictures were cut out, we styled our ad the way we wanted it to appear. Along with the magazine pictures, we used crayons to make creative drawing designs. After assembling the pictures and drawing with crayon on the piece of paper, now was time to place the ad on the final piece of paper.
3.) Describe the final output product:
On my ad, I had a lot of color that made the ad pop out more to the viewer. I had various lines and my balance is good in my ad. Emphasis is shown and the lines are clearly portrayed when the nail polish is dripping down the page.
4.) Describe the feedback you received during the project:
My instructor gave me feedback on my ad about line, showing me different ways I can incorporate them into my ad. Also I asked different questions to my peers like if my ad seemed balanced? If it was not balanced I would've asked for their suggestions on how to make it balanced.
5.) What did you learn during the assignment?:
During the assignment I learned to use a lot of color to make it appealing to the viewer as well as balance throughout my ad. I also learned how to create line and emphasis on my ad. I can apply what I learned from this assignment if I created ads for a living.
6.) What would you do differently if you were asked to do this project again?:
If I were to do the whole project again I would instead use more magazine parts in my ad. I have very few magazine parts and more crayon, and next time I would rather have more magazine parts.
- Scissors
- Magazine
- Glue
- Paper
- Crayons
2.) Describe process in detail:
Basically, in this project, we all brought in magazines so we can cut the pictures out to make our ads. First, we thought of an idea for an ad by looking through different magazines. Next was cutting out the pictures that were needed in the magazine ad. Once the pictures were cut out, we styled our ad the way we wanted it to appear. Along with the magazine pictures, we used crayons to make creative drawing designs. After assembling the pictures and drawing with crayon on the piece of paper, now was time to place the ad on the final piece of paper.
3.) Describe the final output product:
On my ad, I had a lot of color that made the ad pop out more to the viewer. I had various lines and my balance is good in my ad. Emphasis is shown and the lines are clearly portrayed when the nail polish is dripping down the page.
4.) Describe the feedback you received during the project:
My instructor gave me feedback on my ad about line, showing me different ways I can incorporate them into my ad. Also I asked different questions to my peers like if my ad seemed balanced? If it was not balanced I would've asked for their suggestions on how to make it balanced.
5.) What did you learn during the assignment?:
During the assignment I learned to use a lot of color to make it appealing to the viewer as well as balance throughout my ad. I also learned how to create line and emphasis on my ad. I can apply what I learned from this assignment if I created ads for a living.
6.) What would you do differently if you were asked to do this project again?:
If I were to do the whole project again I would instead use more magazine parts in my ad. I have very few magazine parts and more crayon, and next time I would rather have more magazine parts.
Flyer
1. What are your input factors?
- Computer
- Pictures
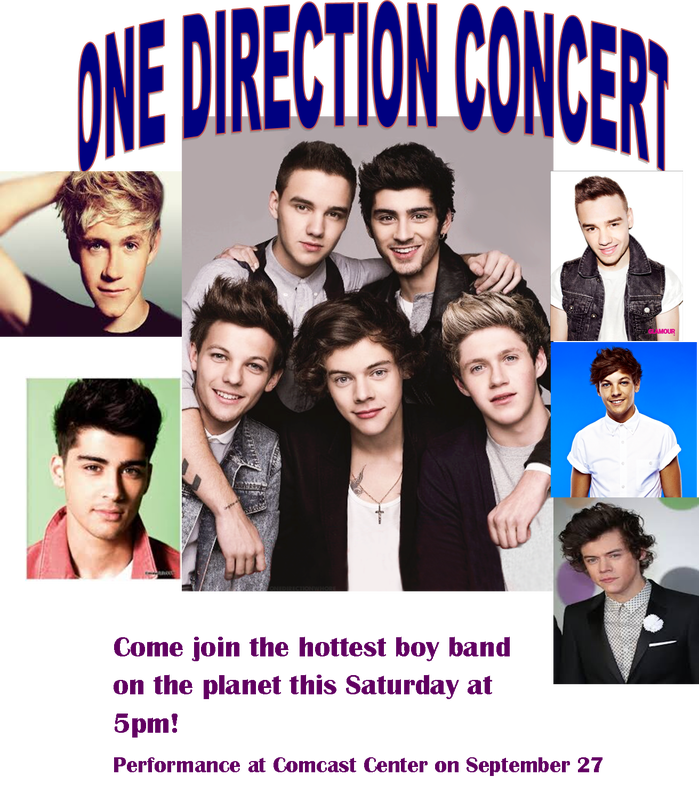
2. Describe process in detail: In designing my flyer, I used word art to create a heading that would be appealing to the viewer. Once, I got the header I wanted, I searched on the computer for images that is catching to the eye. At the bottom of the flyer, I said where, when, and the time of the One Direction Concert flyer.
3. Describe the final output product:
In my One Direction flyer, I followed the law of thirds by including a header at the top, pictures in the middle, and a caption at the bottom. The caption at the bottom contained when, where, and the time of the concert.
4. Describe the feedback your received during the project:
During this project, my instructor suggested to make a header that would stand out. My peers also suggested to do the same and also include a lot of pictures.
5.What did you learn from doing this assignment? Where else could you use what you learned? How can you apply what you learned to things outside of school?
I learned how to catch the viewers eyes by making a header that will stand out, adding colorful pictures, and adding a caption for the reader to know when the event is. I can apply what I learned from this flyer project if I were to have my own business and would need to create a flyer for my costumers.
6. What would you do differently if you were asked to do this project again?:
If I were to do this project again, I would instead assemble the pictures onto the page a little differently because they have a general set up.
- Computer
- Pictures
2. Describe process in detail: In designing my flyer, I used word art to create a heading that would be appealing to the viewer. Once, I got the header I wanted, I searched on the computer for images that is catching to the eye. At the bottom of the flyer, I said where, when, and the time of the One Direction Concert flyer.
3. Describe the final output product:
In my One Direction flyer, I followed the law of thirds by including a header at the top, pictures in the middle, and a caption at the bottom. The caption at the bottom contained when, where, and the time of the concert.
4. Describe the feedback your received during the project:
During this project, my instructor suggested to make a header that would stand out. My peers also suggested to do the same and also include a lot of pictures.
5.What did you learn from doing this assignment? Where else could you use what you learned? How can you apply what you learned to things outside of school?
I learned how to catch the viewers eyes by making a header that will stand out, adding colorful pictures, and adding a caption for the reader to know when the event is. I can apply what I learned from this flyer project if I were to have my own business and would need to create a flyer for my costumers.
6. What would you do differently if you were asked to do this project again?:
If I were to do this project again, I would instead assemble the pictures onto the page a little differently because they have a general set up.
Black and White flyer
What are your input factors?
- Computer
- Pictures
Describe process in detail:
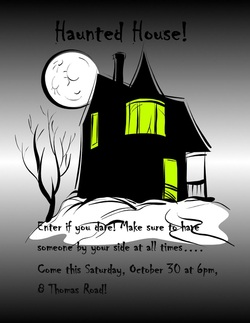
In my black and white flyer, I basically added in a header font that gave a Halloween vibe to it and I then added a haunted house photo from Google. At the bottom I included when, where and the time the haunted house was.
Describe the final output product:
The picture I added created a spooky theme for the flyer. The font of the words also gave a scary vibe to the viewer.
Describe the feedback you received during this project:
In my Haunted House flyer, my instructor suggested to have a font for the words that would attract the viewer. My peers also said the same, but include a picture that would attract the viewer.
What did you learn from doing this assignment? Where else could you use what you learned? How can you apply what you learned to things outside of school?:
From doing this project, I learned how to catch the viewers attention by including a font that gave a Halloween vibe and have a picture that also gave a spooky vibe. If I were to use what I learned outside of school, I would use it when I created a flyer for an event.
What would you do differently if you were asked to do this project again?:
If I were to do this project again I would add more picture to give a more spooky theme.
- Computer
- Pictures
Describe process in detail:
In my black and white flyer, I basically added in a header font that gave a Halloween vibe to it and I then added a haunted house photo from Google. At the bottom I included when, where and the time the haunted house was.
Describe the final output product:
The picture I added created a spooky theme for the flyer. The font of the words also gave a scary vibe to the viewer.
Describe the feedback you received during this project:
In my Haunted House flyer, my instructor suggested to have a font for the words that would attract the viewer. My peers also said the same, but include a picture that would attract the viewer.
What did you learn from doing this assignment? Where else could you use what you learned? How can you apply what you learned to things outside of school?:
From doing this project, I learned how to catch the viewers attention by including a font that gave a Halloween vibe and have a picture that also gave a spooky vibe. If I were to use what I learned outside of school, I would use it when I created a flyer for an event.
What would you do differently if you were asked to do this project again?:
If I were to do this project again I would add more picture to give a more spooky theme.
Dog Grooming Brochure
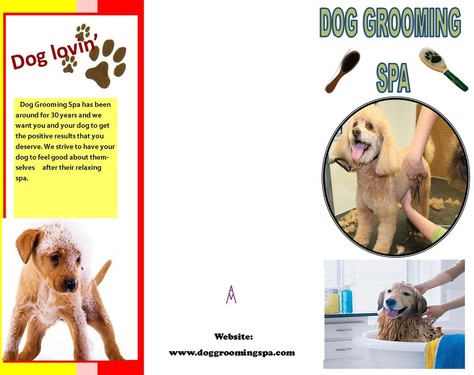
In my brochure for the Dog Grooming Spa, I searched for pictures for dog grooming to add to my brochure. The front page I included my business name, and a few pictures that would attract the reader into picking my brochure up On the inside, I included what we offered. I explained that we have nail clippings, a wash and bath session, a styling session, and a brushing teeth session. On the inside in the middle, I had the prices for each session. I also had t=how long the sessions usually last for and how great our business is.

Thayer Street Brochure
1. What are your input factors?
The input factors was a camera, a notepad, and a map.
2. Describe process in detail:
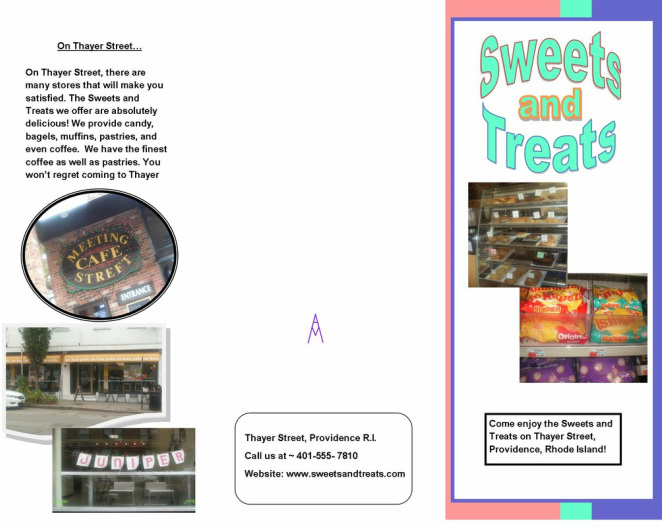
The process of creating a brochure started when my Graphics class took a trip to Thayer street in Providence, Rhode Island. At Thayer street, we visited the shops that were related to our subject for the brochure. In each shop or restaurant, we observed what kind of sweets and treats the shop had and recorded the information down onto a notepad. At each shop we took photos of what the business offered for sweets and treats. Later on, we collected the information we observed at Thayer and produced a brochure on what stores had sweets and treats and we also created a map that shows Thayer Streets stores.
3. Describe the final output product:
After updating the photos from Thayer Street onto the computer for the brochure, I added the names of the stores we explored. Included in my brochure was what each store offered. In the brochure, there was a variety of color along with a website. The phone number is there for any questions about the sweets and treats on Thayer.
4. Describe the feedback you received during this project:
My instructor discussed how the color pops out to the reader and that everything should be evenly balanced throughout the brochure. My peers suggested I used more color and pictures as well.
5. What did you learn during this assignment? How can you apply what you know from this assignment out of school? :
In this assignment, I learned how to make my brochure appealing to the reader by adding a variety of colors and add as much information as possible with out overwhelming the reader. Outside of school, if I owned a business and I wanted people to see what I offered at my business, I would make a brochure and I would follow the steps on how to make one from this assignment.
6. What would you do differently if you were asked to do this project again?
If I were to do this project again, I would add a little more information about what each store offered to the customers,

